All the samples given here are using Microsoft Office XP.
Twinkle Twinkle Little Star 1
Have you ever sung "Twinkle Twinkle Little Star"? Or have you ever written the song and drawn stars to decorate it with Microsoft Word? Follow these steps and have fun with it!
Type the lyric of Twinkle Twinkle Little Star on Microsoft Word's Workspace
Type the lyric of Twinkle Twinkle Little Star on Microsoft Word's Workspace
- Set the aligment to the center of page
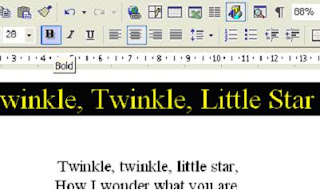
- Mark the title and change the size of the font to "28" by selecting the shortcut as shown below
- Set the title to bold by selecting shortcut as shown below (letter B for Bold-Shortcut)
- Change the title's color by selecting the colour through the shortcut as shown below. Pick up the blue color
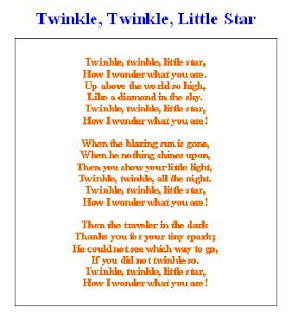
- Mark the other text, then click the Bold-Shortcut, and pick the orange color. Below is the result of above statements
- Place the cursor below the title. And select the shortcut to draw a Rectangle
- Once you click the shortcut, the drawing canvas will appear on the workspace. Press Delete button on keyboard to remove the the canvas.
- Draw a rectangle by clicking and then dragging pointer above the song's lyric. The rectangle will cover the text.
- Right click on the rectangle then click Format AutoShape...
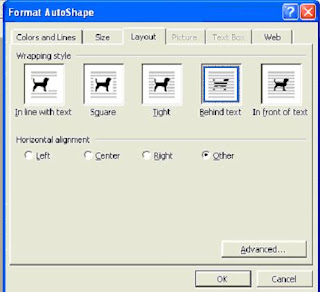
- Click Layout Tab on Format Autoshape Dialog Box, click the Wrapping style Behind text as shown below. Then click OK
- The rectangle will move behind the text as shown below
- Right click on the rectangle again, click Format Autoshape. On Format Autoshape Dialog Box, click Colors and Lines Tab. Pick the Fill Color Dark Blue. Then click OK.
- The rectangle will be colored in blue.
- Now, click the Autoshape shortcut (see previous post : drawing with MS Word), and select Stars and Banners, then click 5-points Star. If the canvas appear, just remove it by pressing Delete button on keyboard.
- Click on the rectangle, then the star will automatically be drawn on workspace.
- Right-click on the star. Click Format Autoshape, click Size Tab, mark the checkbox "Lock aspect ratio", change the Height Scale to 50%, then click OK.
- Draw another stars and change the size (by following step 16). Below is the example of the result.
Drawing With Microsoft Word
Microsoft Word has feature for drawing in order either to decorate the workspace or just for drawing. Drawing with Microsoft Word is so easy and fun, though the result is very simple. How to draw?
- First, make sure the Drawing Toolbar is already activated. If it is not yet, then click View at menubar, move pointer above Toolbar and click Drawing.
- Click the Autoshapes menu at Drawing Toolbar.
- Pick up the Drawing Category by moving pointer above the submenu.
- Click the Object you want to add to workspace
- Once you clicked the object, then appear the drawing area (canvas). The canvas can be removed by pressing Delete button on keyboard.
Chessboard's Styles
Here are few samples of chessboard with different styles. By adjusting border style we can modify the chessboard. See the previous post titled Chessboard and 3D Chessboard to create the chessboard with Microsoft Word.
We can also modify the colour of the border or the cell's background or even both of them. Just have it your own way! :)
We can also modify the colour of the border or the cell's background or even both of them. Just have it your own way! :)


3D Chessboard
Creating a chessboard with Microsoft Word is very easy and fun. This time we'll make a 3D chessboard. Follow these simple steps!
Chessboard
Everybody knows chess. And of course, almost of us ever played chess. Though it is not easy to play, but it is so easy to make the chessboard. Even your kids can make it. Follow these steps!
- Start up your computer and run the Microsoft Office Word
- Create a new blank document and create a table by clicking the Table menu
- Move the pointer over the submenu Insert and click the sub-submenu Table
- The "Insert Table" Dialog Box will appear then
- Make a table contains of 8 columns and 8 rows by increasing the value of "Number of columns" and "Number of rows" into "8". Then click OK
- The table will automatically be drawn on your workspace
- Mark the table. Then right-click on it, click the submenu Table Properties
- Click Row's tab. Mark the checkbox, adjust the Specify height into "2 cm" and choose "exactly" on combobox Row height is
- Click Column's tab. Adjust the Preferred width value into "2" and change the Measure in "Centimeter". Then click OK
- The table now has the same size both width and height. Then mark table cell in first row and first column, and right-click on it then click Borders and Shading...
- Click Shading's tab and click the black colour then click OK
- The cell's background will be black painted as well. Repeat step number 10 and 11 to set other cell's background. Set the colour like picture as shown below untill the last cell.
- Once all cells are painted, mark the chessboard (table) and right-click on it
- Click submenu Borders and Shading, then click Border's tab and choose the line Style like picture as shown below, then click OK
- The chessboard is now complete.
Subscribe to:
Comments (Atom)


